Several Windows users have been complaining that they receive the Error 0x8004210A whenever they try to send or receive an email with Microsoft Outlook. Most affected users are saying that they only encounter this issue with some emails (not all of them). In most cases, this problem is reported to occur on older Outlook versions such as Outlook 2010, Outlook 2012 (or even older version). Based on our investigations, the issue is not exclusive on a certain Windows version since it’s reported to occur on Windows 7, Windows 8.1 and Windows 10.

What’s causing the Error 0x8004210A?
We’ve investigated this particular issue by looking at various user reports and by testing out the different repair strategies that are commonly recommended by other affected users that already managed to fix the problem. As it turns out, several different scenarios might lead to the apparition of this particular issue. Here’s a shortlist of potential culprits that might trigger this error code:
- The server Timeout period is too short – As it turns out, one of the most common factors that will cause this error code is an insufficient Server Timeouts period. Certain email providers need more time to complete the exchange of data, so if your Outlook is configured to work with very limited server timeout time, it might stop the data exchange before it’s completed. If this scenario is applicable, you should be able to resolve the issue by boosting the Server Timeouts setting.
- 3rd party AV interference – If you’re using a 3rd party suite, you may be dealing with an overprotective security monitoring software that is interfering with the connection between your email client and the email provider server. In this case, you should be able to resolve the issue either by disabling the email shield feature or by uninstalling the 3rd party suite altogether and opting for a more lenient security scanner.
- Corrupted Outlook file – Another potential culprit that might end up causing this behavior is corrupted .PST or .OST file. Several affected users have confirmed that an email file affected by corruption has ended up preventing the communication with the email servers. In this case, you should be able to fix the problem by running the Inbox Repair Tool to repair the Outlook file.
- Corrupted Office Installation – As it turns out, this particular error code can also be facilitated by broader corruption issues that are located inside the Office installation folder. If this scenario is applicable, the only viable fix is to use the built-in repair capabilities of Office to repair the entire installation to fix any corrupted instance.
If you’re encountering this problem and you’re looking for a fix that will allow you to send emails without facing this error code, this article will provide you with several different troubleshooting guides. Down below, you’ll find a collection of potential fixes that other users in a similar situation have successfully used to get to the bottom of the issue and fix this behavior.
If you’re looking to be as efficient as possible, we advise you to follow the potential fixes in the same order since we ordered them via efficiency and severity. Eventually, you should stumble upon a fix that will resolve the issue regardless of the culprit that’s causing the problem.
Let’s begin!
Method 1: Increasing the server timeouts
As it turns out, one of the most common issues that will ultimately cause the Error 0x8004210A is an incorrect Server Timeout issue. Keep in mind that Outlook needs to work with a stipulated time to complete the entire sending/receiving procedure. If that period is insufficient to contain the email server and complete the exchange of data, the Error 0x8004210A will ve thrown by your email client (Outlook).
Several affected users have managed to resolve the issue by accessing Outlook settings and enlarging the Server Timeout settings. Most affected users that have followed this guide have reported that they’ve successfully prevented the Error 0x8004210A from ever appearing again by raising the server timeout default value.
In most cases, this will give your email client enough time to complete the exchange of data. Here’s a quick guide on resolving the 0x8004210A by raising the Server Timeouts count:
- Open your Outlook application and go to File from the ribbon bar at the top. Once you get there, go to the Info tab and click on Account Settings > Account Settings…
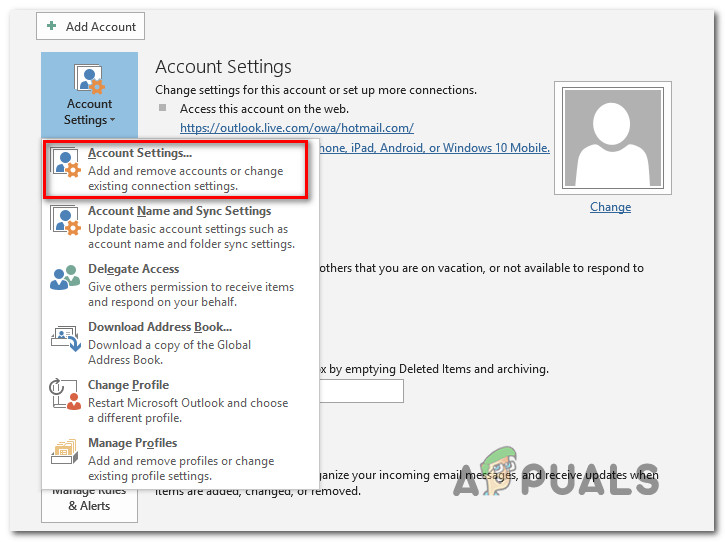
Accessing the Account Settings menu of Outlook - Once you’re inside the Account Settings menu, select the Email tab from the list of available menus. Then, click on the email that you’re having issues with, click the Change button from the list of context options available above this.

Account Settings – Outlook - Once you’re inside the Change Account menu, turn your attention towards the bottom right section of the screen and click on More Settings.
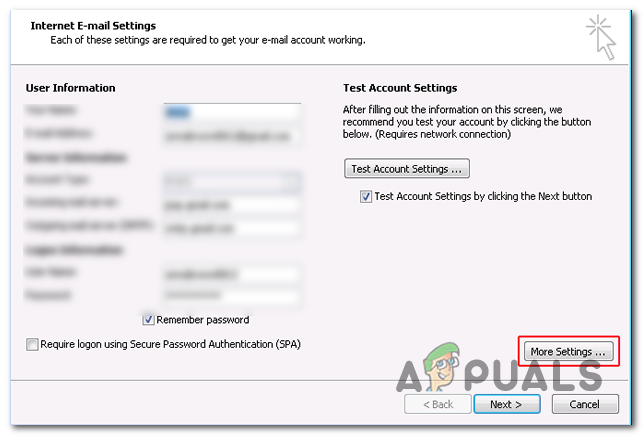
Accessing the More Settings menu of Outlook - Once you’re inside the Internet E-mail Settings menu, select the Advanced tab from the newly appeared context menu and modify the Server Timeouts value to 1 Minute or more.

Modifying the Server Timeouts default value - Save the modifications that you’ve just made by clicking Ok.
- Restart your computer and wait for the next startup to complete. Once the booting sequence is complete, open Outlook and try to send another email.
If you’re still encountering the same 0x8004210A error, move down to the next method below.
Method 2: Disabling the third party AV interference
As it has been reported by several different affected users, this issue can very well be triggered by an overprotective AV suite. According to user reports, there are mainly two scenarios that will facilitate the error code 0x8004210A in conjunction with 3rd party security suites:
- 3rd party suite uses an integrated Outlook scanning feature
- The security suite/ firewall is interrupting the connection between your email client and the email server.
If you’re using a third-party suite and you’re thinking that one of the scenarios described above might be applicable, you have a couple of potential repair strategies at your disposal.
First things first, start by ensuring that your AV doesn’t have an Email Shield (or similar equivalent). To do this, access your AV settings menu and look for an option to disable Email Shield. Chances are you’ll only need to uncheck (disable the associated toggle).

If this didn’t work or you’ve discovered that the Email Shielding function wasn’t enabled, you should start investigating if your 3rd party suite is actually blocking the communication with the email settings with a firewall setting – McAfee & Karsperkly are among the most commonly reported 3rd party suites with the potential of causing this issue.
Keep in mind that if a firewall setting is actually causing the problem, simply disabling real-time protection will not help your situation since the same security rules will remain firmly in place. In this case, the only viable fix that you have at your disposal is to uninstall the 3rd party suite and ensure that you’re also removing any leftover files that might still be causing the same problem.
Here’s a quick guide on how to do this:
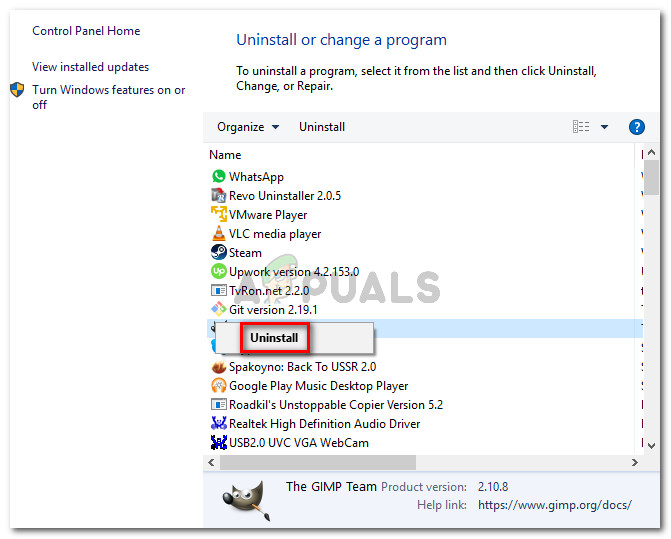
- Press Windows key + R to open up a Run dialog box. Next, inside the Run box, type “appwiz.cpl” and press Enter to open up the Programs and Features menu.

Type appwiz.cpl and Press Enter to Open Installed Programs List - Once you’re inside the Programs and Features screen, scroll down through the list of installed applications and find the 3rd party AV suite that is currently serving as the default security protection suite. Once you see it, right-click on it and choose Uninstall from the newly appeared context menu.
Uninstalling the security suite - Inside the next window, follow the on-screen prompts to complete the process, then restart your computer to complete the uninstallation.
- At the next startup sequence, follow this article (here) to ensure that you’re not leaving behind any leftover files that might still trigger the same issue in the future.
Method 3: Using the Inbox Repair Tool
As it turns out, another fairly common scenario that might contribute to the apparition of the 0x8004210A error is an inconsistency with the Outlook (.PST or .OST) file. If this critical email file is tainted by corruption, your email application might be prevented from communicating with the email servers.
Some users that were also struggling to resolve this problem have managed to do so by fixing the .PST or .OST file by using the Inbox Repair tool and restarting their computer. After doing this, most affected users have reported that they were able to send and receive emails without seeing the 0x8004210A error ever again.
Keep in mind that although this tool is included with all the recent Outlook versions, the location might be different depending on the Outlook version that you’re using. For the sake of keeping the instructions as simple as possible, we’re going to showcase a way that will work universally (regardless of the Outlook version that you’re using).
Note: We’ve only been able to verify the steps below on Outlook 2013 and later. If the steps below do not apply to your Outlook version, move directly to Method 4.
Here’s a quick guide on repairing the Outlook (.PST or .OST) file using the Inbox Repair Tool:
- Make sure that Outlook and any associated app or service is completely closed.
- Next, visit this link (here) and download the Inbox Repair tool. Wait patiently until the download is complete.
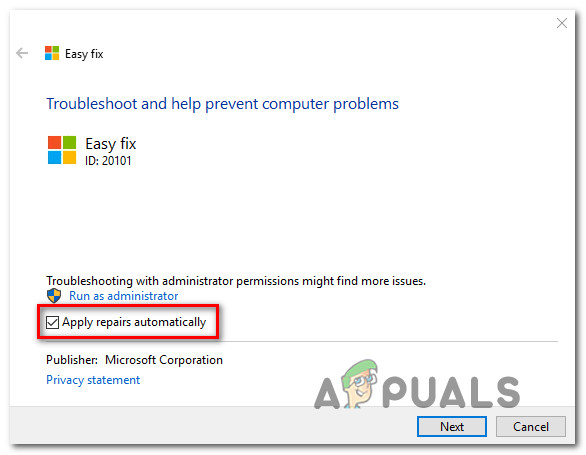
- Once the download is complete, double-click on the executable and wait for it to launch. At the first screen, click on the Advanced hyperlink, then ensure that the box associated with Apply repairs automatically is checked. Then, click on Next to move over to the next screen.
Applying repairs automatically - Wait until the scan determines if there’s indeed an issue with the Outlook .PST / .OST file. If a problem has been identified, the utility will automatically recommend a viable repair strategy.
Resolving the issues with your .PST file - Once you get to the Microsoft Outlook Inbox Repair menu, click on Browse, then navigate to the location where your .PST / .OST file is stored.
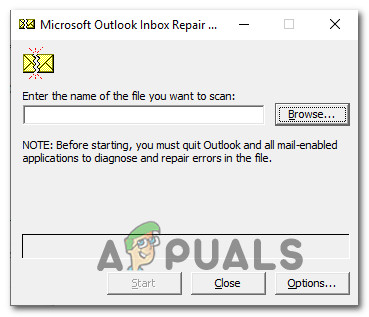
Selecting the .PST file using the Browse menu Note: If you don’t know the location of your Outlook file, look in the default location (C:\Users\ \AppData\Local\MicrosoftOutlook). Unless you have established a custom location, you should be able to find the file in here.
- Once the process is complete, restart Outlook again and see if the issue is resolved at the next system startup.
Method 4: Repairing the Office Installation
If you’ve followed the instructions above and you’ve confirmed that the issue is not occurring due to a corrupted Outlook file (.PST or .OST), there’s a high chance that the issue is encountering due to some kind of corruption inside the Office installation that ends up limiting the functionality of the Outlook app.
Several Windows users that found themselves in a similar situation have reported that they finally managed to resolve the issue entirely by repairing the entire Office installation using the built-in functionality.
If you recently noticed signs that the Office installation might have been corrupted (a quarantined item, a weird startup error, etc.) you should continue by ensuring that you’re not dealing with a corrupted Office installation by repairing it via the Programs and Features menu.
Here’s a quick menu on repairing the Office installation to resolve any system file corruption that might be causing the problem:
- Press Windows key + R to open up a Run dialog box. Next, type “appwiz.cpl” and press Enter inside the text box to open up the Programs and Features menu.
Type appwiz.cpl and Press Enter to Open Installed Programs List - Once you manage to get inside the Programs and Features screen, scroll down through the list of installed applications and locate your Office installation. Once you see it, right-click on it and choose Change from the newly appeared context menu.
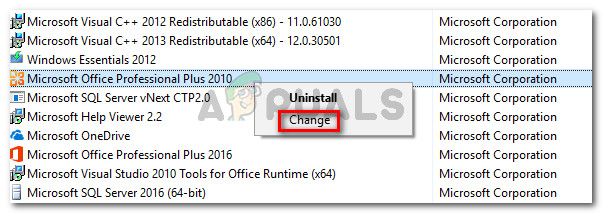
Accessing the repair menu of the Microsoft Office installation Note: If you’re prompted by the UAC (User Account Control) menu, click Yes to grant administrative privileges.
- Inside the repair menu, click on the Quick Repair option, then click on Continue to start the repair process.
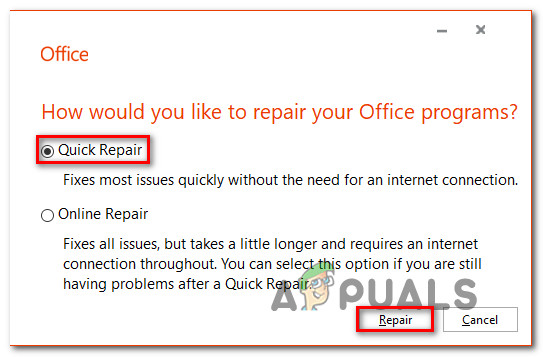
Repairing the Office Installation Note: Keep in mind that depending on your Office installation, this menu might appear differently on your screen.
- Once the process is complete, restart your computer and see if the issue is resolved at the next system startup.