The more you use your Microsoft Outlook mailbox, the more your mailbox grows. If you think about it, it’s quite similar to how papers tend to pile up on your desk. But what can you do when the pile gets so big it needs to be dealt with? Well, in real life, you can take the time to sort each document and store those papers that are important while discarding less important ones. Luckily, you can recreate the same process in Outlook.
Without exception, every version of Outlook supports Archiving. Even more, you have multiple choices when it comes to archiving your items in Outlook. The most convenable way is to use AutoArchive to deal with older messages, appointments, and tasks. Another way to do it is to use manual archiving to move messages to a specific folder. But the quickest way is to use the Archive button located in the File Menu.
Keep in mind that Outlook keeps a default folder for archiving purposes that can’t be deleted. Archiving your email will help you keep a clean shop, making it easier to search for older emails while keeping your inbox uncluttered.
Below you have a series of guides that will walk you through archiving items in Outlook in every possible way. Let’s begin!
Method 1: Manually archiving messages with a single action
This method is the quickest way of moving one or more messages to the Archive folder. These archived files will remain accessible via the search box or by manually navigating to the Archive folder. The archived items can also be viewed on mobile devices by visiting the Archive folder. Here’s a quick guide on manually archiving items in Outlook 2016:
- Open Outlook and select one or more messages in your Inbox or any other folder.
- Click the Archive icon inside the Delete group. The archive icon is only visible inside the ribbon in Outlook 2016.
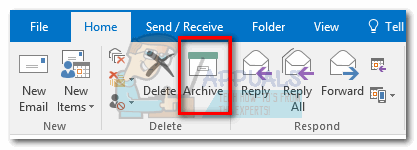 Note: You can also hit the Backspace key to achieve the same result.
 - You should be able to find your messages inside the archives folder.
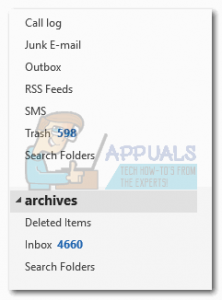 Note: The Archive folder is automatically created even if you never used it before. If you can’t see the Archive folder, go to File > Office Account > Update Options and click on Update Now.
Method 2: Using the AutoArchive Feature
Outlook has an automatic feature capable of archiving items called AutoArchive. This feature can be programmed to archive items at regular intervals. All versions of Outlook have support for archiving. The difference is, AutoArchive is turned off by default in Outlook 2010 and later.
After AutoArchive is enabled, users can set properties for each folder they want to be archived. Keep in mind that when you archive an email, it will be moved into another PST file and will no longer be available in the main PST file. Here’s a quick guide on enabling and using AutoArchive:
How to Enable and Configure AutoArchive
- To turn AutoArchive on, navigate to File > Options. Once you’re inside Outlook Settings, click the Advanced tab to bring it forward, then click on AutoArchive Settings.
 Note: In Outlook 2007 and older, you can find the AutoArchive settings in Tools > Options > Other.
 - If everything is grayed out, you need to tick the box next to Run AutoArchive in order to enable AutoArchive.
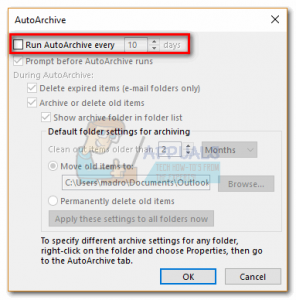
- Now it’s time to configure how AutoArchive will behave. Start by choosing how frequently you want Auto Archive to run. The default is 14 days, but if you want to keep it clean, set it somewhere between 2 and 6.
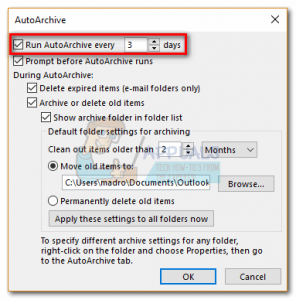
- If you want to be notified before AutoArchive starts, tick the box next to Prompt before AutoArchive runs. It’s a good idea to live this option enabled since auto-archiving has the potential of interfering with your work.

- To avoid filling your archive with unnecessary emails, it’s a good idea to leave Delete expired email ticked. If you disable Archive or Delete old items, only expired messages will be completely deleted.
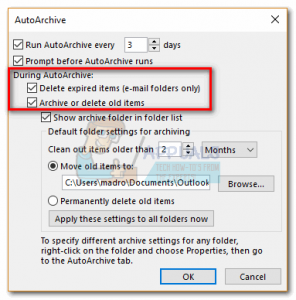
- If you want your archive folder to be visible inside Outlook, you need to enable Show archive folder in folder list.

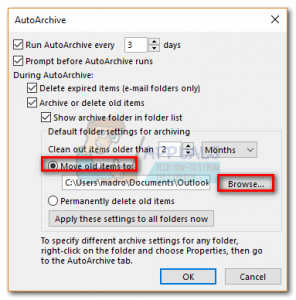
- Now set the default folder settings for archiving.
- Next, enable the toggle next to Move old items to and click Browse to set the path to where you want your items to be archived. Hit Ok to confirm your settings.
After you enabled and configured AutoArchive, it will automatically do its job in due time. You can confirm that it’s working by checking if the Archives folder is being populated.
Configuring AutoArchive properties for individual folders
After you finish configuring the AutoArchive feature, you can add an extra layer of control by setting specific properties for each of your folders. It’s common practice for folders such as Deleted Items or Spam to use different AutoArchive properties than your main email folder.
Note: If you don’t set individual AutoArchive settings for a folder, it will automatically use the global AutoArchive settings configured above.
Here’s a quick guide on setting individual AutoArchive properties to a folder:
- Right-click on the folder you want to treat preferentially and click on Properties.
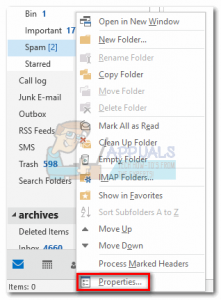
- Click the AutoArchive tab to bring it forward. Here you have a selection of settings that will apply solely to this folder.
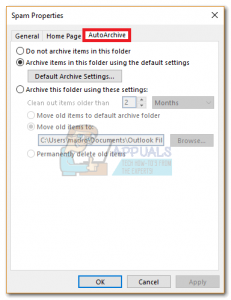
- You can turn off AutoArchive for this folder by clicking on Do not archive items in this folder.

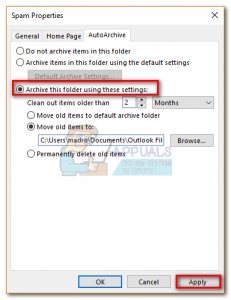
- In order to override the global AutoArchive settings, click on Archive this folder using these settings and make your modifications below. Click Apply to confirm your settings.
 Note: Keep in mind that these settings won’t apply to any of the subfolders of this particular folder. You will need to modify each one.
Method 3: Manually Archiving emails using Cleanup Tools
If you’re not a big fan of automation, there’s a middle ground solution that will allow you to archive in bulk with even more control. With this method, you can archive an entire folder along with its subfolders. If you don’t want to wait for AutoArchive to kick in, you can do it yourself and choose where you want to save them. Here’s what you need to do:
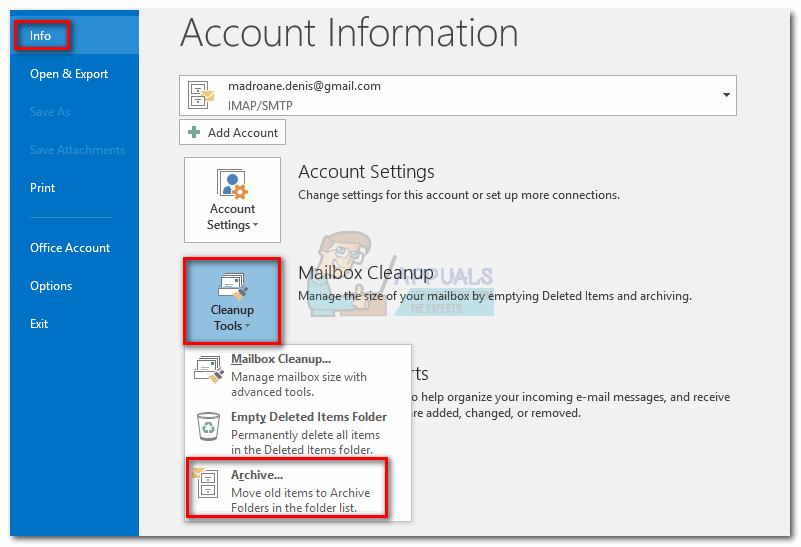
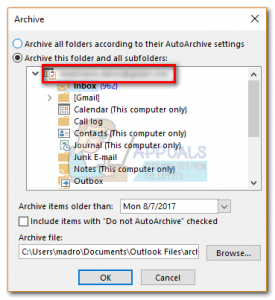
- Click the File tab, then go to Info and expand the drop-down menu from Cleanup Tools. Select Archive from the drop-down menu.
- Select Archive this folder and all subfolders and click on the folder that you want to be archived.
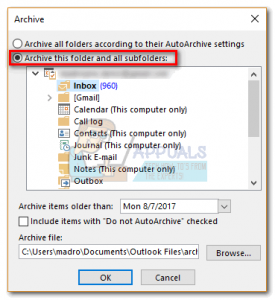
- If you want your entire Outlook data to be archived, click on your email address at the top of the list.
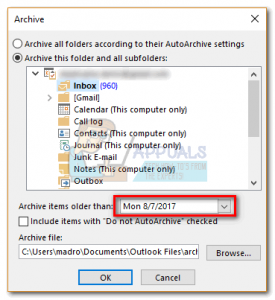
- Use the drop-down menu next to Archive items older than to select the latest date for items to be archived. All items older than the date you set in this menu will be archived.
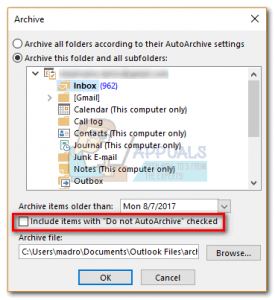
- You can archive items that were previously excluded from auto archiving by checking the box next to Include items with AutoArchive.
- Use the Browse button to set the path to where you want to your PST archive to be saved. Click Ok to kick-start the process.

You’ll shortly notice that some emails will be moved from your default folders to the archived pst file.
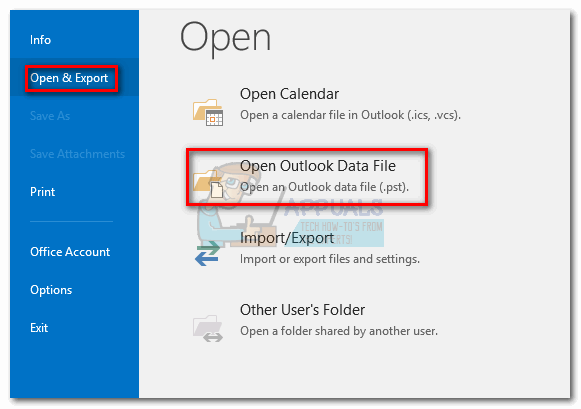
Note: The archived file should become accessible in Outlook as a folder. If for some reason it doesn’t go to File and click Open & Export. Then, click on Open Outlook Data file, navigate to the location of your archive and hit OK.