Fast charging is a concept that was first invented by Qualcomm in 2013. Since then it was upgraded several times and was adopted in different forms by a lot of smartphone manufacturers. But most of us heard about fast charging as the hottest new feature introduced with Samsung Galaxy S6.
Now, all the top global smartphone companies use fast charge in one form or another. We live our lives in a way where every second matters, and fast charging can help us save valuable time.
The technology is incredibly helpful as it can fully charge your phone in less than an hour. Some devices even manage to get 4 additional hours of use with just 10 minutes of charging.
How does quick charging work?
In order to understand the power of quick charging, we need to analyze how regular chargers used to work. Until now, chargers were careful not to allow too much current flow into the device because it had the potential of damaging the battery and frying the phone in some cases.
Quick charging works with an increased limit of voltage that allows for considerably smaller charging times. Even if it sounds risky, the technology has been around long enough for it to be safe. And no, the Note 7 fiasco had nothing to do with fast charging.
But as with all developing technologies, things are not perfect. Users are reporting problems with fast charging merely after they’ve purchased their device. With this in mind, let’s take a look at the most common factors that will cause your phone to stop fast charging:
- Using a charger that doesn’t support adaptive fast charging
- Faulty adapter
- Broken USB cable
- Lint / Dirt accumulation inside the micro-USB port (charging port)
- Faulty charging port
- Fast charging is disabled from Settings
- Software glitch
There’s no way to identify the problem through a single step, so bear with us and follow each method in order until you manage to find a solution that will re-enable fast charging or at least pinpoint the problem. Let’s begin.
Before Proceeding:
- Make sure that the charging cable is plugged in firmly. You need to apply a lot of force to get it in the whole way so don’t shy away from exerting some force until you hear the cable click.
- Reset the battery cycle by draining it completely until it turns off and then charging it all the way up to 100% because this resets the battery cycle and it should help in fixing any charging related bugs. Repeat this process for at least 5 to 6 times before giving up.
- Pull down your notifications panel and toggle the screen brightness from auto to manual and then back to auto.
- Change your USB cable and if that doesn’t fix it, try to use any other fast charger.
Method 1: Making sure Fast Charging is enabled from Settings
Some manufacturers have an option that allows you to disable fast charging from the Settings menu. Who knows? You might have disabled it by mistake or a software update has done it for you. A lot of Samsung Galaxy S6 users have noticed that fast charging was disabled with the Android 6.0.1 update. Before you do anything else, here’s how to make sure fast charging is enabled on your device’s settings:
- Open the App Menu and tap on Settings.
- Tap on Battery.
- Scroll all the way down to the last option. Make sure the toggle next to Fast cable charging is enabled.
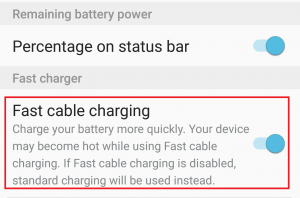
- Plug in your phone with the original charger and see if fast charging is working. If not, restart your device and try again before proceeding to the next method.
Method 2: Using a Certified Fast Charger
Making sure you’re using a certified fast charger is incredibly important. A traditional charger won’t be able to amplify the charging power as certified ones can. Additionally, you should make sure the wall charger you’re connecting to has an output rating of at least 2 Amps.
Start by looking at your charger’s adaptor. If it’s capable of fast charging, it should be written on it. Depending on the manufacturer, it should say something like “Adaptive Fast Charging“, ” Quick Charging“, “Dash Charging” or “Fast Charging“. If you don’t see anything related to fast charging on your adapter, chances are you’re trying to fast-charge with a charger that is not capable of doing that.
If your charger does, in fact, says that it supports a fast charge, proceed to the next method.

Method 3: Using a different USB cable
In most cases, the USB cable breaks down before the adapter does. Using a faulty USB cable doesn’t necessarily mean your phone will stop charging completely. In some cases, only one of two gold connectors inside the micro-USB slot will get broken, rendering the phone incapable of fast-charging, but still able to re-charge in regular mode.

Let’s prove that this is the case by replacing the USB cable with another one. Replace only the cable, but keep using the same wall charger. If it fast charges with this newly inserted cable, then you need to ditch your old one.
If it didn’t work, there’s still something else to do here if you have the means. If possible, try the charger/cable combination that wasn’t charging properly on another fast-charging device. If it doesn’t’ work with the other device, the most likely issue is the charger.
Method 4: Removing Lint / Dirt Accumulation
If the methods above haven’t done the job, it might be a worth look inside your charging port for any lint, dirt or other debris. Sometimes, the accumulation of dirt and lint around the connectors will hinder the transfer of electricity. Here’s a quick guide to making sure that’s not happening:
- Start by using a flashlight to take a look inside the micro-USB port. Do you see any sign of foreign material? If you do, move forward.
- Turn OFF your phone completely and use a small pair of tweezers, a needle or a toothpick to remove any large accumulation of debris.

- Dip a small cotton swab in rubbing alcohol and let it sit for a while.
- Use the cotton swab to perform circular motions inside the charging port, in order to remove any remaining dirt.
- Let your phone dry up for an hour or two before powering it on again.
- Connect the charger again and see if it’s fast-charging or not.
Method 5: Charging in Safe Mode
If you’re still without fast-charging, let’s rule out the possibility of a software conflict. We can do this by starting the device in Safe Mode and see whether it’s capable of doing a fast charge.
While in Safe Mode, your device will not run the apps you’ve installed so far and will only rely on preloaded apps that ship with the device. Let’s start by entering Safe Mode:
- With your phone turned on, press and hold the Power button for several seconds.
- When you see the power options menu, tap and hold on Power off.

- If you long-pressed the Power off option right, you’ll get a hidden message asking if you want to reboot in safe mode. Hit OK.
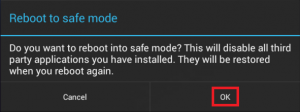
- You’ll now you’re in safe mode by checking if the Safe Mode icon is present in the bottom-left corner of the screen.

- While in safe mode, plug in your charger and see if it’s fast-charging. If it doesn’t work, proceed to the next and final method.
However, if fast charging does in Safe mode, it’s clear that you have an app conflict. Now you need to uninstall every app recently downloaded that you think might interfere with fast charging. If you installed battery management apps, I would start with them. Here’s a quick guide:
- Go to Settings > Application manager > Downloaded.
- Tap on the app you wish to uninstall.
- Tap Uninstall and hit OK to confirm.
- Repeat the procedure with every app you think might be responsible for the software conflict and boot out of Safe Mode to check if it the issue is fixed.
Method 6: Doing a factory reset
If uninstalling shady apps haven’t restored the fast charging capabilities of your device, there’s one more step you can take before sending it in for a repair. But let’s hope that doing a factory reset will fix your issue.
Note: Before you proceed any further, you should know that a factory reset will delete any of your personal data present on the phone. It’s advised to create a backup before going all-in with a factory reset.
- Go to Settings > Advanced settings.
- Tap on Backup & reset and see whether backups are enabled on your device. If you don’t have a backup, you should do one now.
- Scroll down and tap on Factory data reset.

- Tap on Reset Phone and wait for the process to complete.
- Wait for your phone to restart and check if fast charging is working properly.
Method 7: Clearing Cache
In some cases, the USB drivers installed on your phone might be retaining some faulty cache due to which this issue is being triggered. Therefore, in this step, we will be clearing this cache and then checking if that fixes our issue. For that:
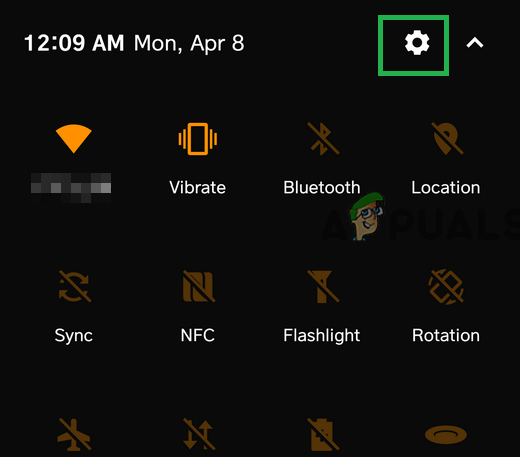
- Slide down the notifications panel and select the “Settings” button.
- Click on the “Applications” option.
- In the top right corner, select the “Three Dots” and then click on the “Show System Apps” button.
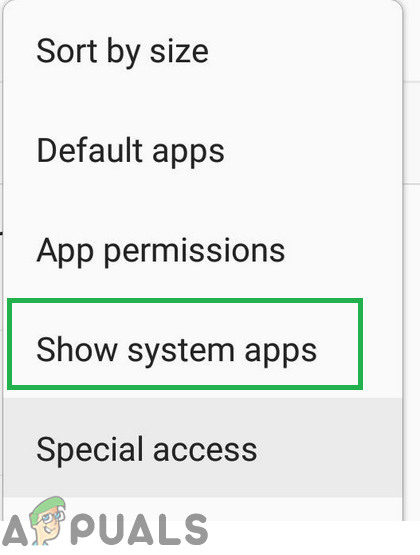
Tapping on the “Show System Apps” option - Select “USB Setting” and/or “USB” from the list.
- Click on the “Storage” option after selecting and click on the “Clear Data” button.
- Also, click on the “Clear Cache” button and restart the phone.

Tapping on the “Clear Cache” button - Check to see if the issue persists.
Method 8: Disabling USB Debugging
In some cases, the error might be triggered if USB debugging mode has been enabled on your mobile. Therefore, it is recommended to disable this mode and check if the fast charging feature works. In order to do so:
- Drag down the notifications panel and click on the “Settings” option.
Dragging down the notifications panel and tapping on the “Settings” option - Scroll down and click on “System”.
- Select the “Developer Options” button and then click on the “USB Debugging” toggle to turn it off.

Turning off USB Debugging in developer options - After disabling, check to see if the issue persists.
If you went through all the methods above and you haven’t managed to get fast charging working again on your device, I’m sorry to say but there’s a high chance your device is suffering from a serious hardware failure. If you’re under warranty, don’t be shy and ask for a replacement straight from the get-go. Some charging ports are attached to the screen, so if you’re suffering from a faulty charging port, you’ll get a free screen to replace.
If you’re under warranty, don’t be shy and ask for a replacement straight from the get-go. Some charging ports are attached to the screen(this is the case with S7 and S7 Plus), so if you’re suffering from a faulty charging port, you’ll get a free screen to replace.